Protecting a route, end to end
This is the long version of the quickstart. It takes one real route and walks the whole way: every entity you need, why each one exists, what to look at while it runs in observation, and the order in which to arm it.
Budget an afternoon for the setup, and a week of real traffic before turning enforcement on. That week is not padding — it is the only thing standing between you and banning your own customers.
The route we are protecting
Something ordinary, so nothing is hand-waved:
api.example.com
  /login          public, credentials posted here
  /v1/*           partner traffic, apikey authenticated
  /docs/*         public, static, crawled on purpose
  /internal/*     called by our own workers from 10.0.0.0/8
What we are going to build
                          ┌──────────────────────────────────────────┐
   one preset plugin ────▶│  threat gate                             │  refuse known bad, first
   on the route           │  bot guard        ─┐                     │
                          │  ip reputation    ─┤ contribute signals  │
                          │  cloud apim waf   ─┘                     │
                          │  threat response  ─── reads the score ───┼──▶ log · tarpit ·
                          └──────────────────────────────────────────┘    challenge · deny · ban
                                        ▲
                     ┌──────────────────┴───────────────────┐
                     │  entities, created once, shared      │
                     │  threat policy · waf config          │
                     │  threat feeds · bot policy           │
                     │  challenge provider                  │
                     └──────────────────────────────────────┘
Six entities. Only two of them are strictly required.
| Entity | Required? | What breaks without it |
|---|---|---|
| Threat policy | Recommended | Falls back to a built-in dry-run policy: everything is recorded, nothing is ever enforced |
| WAF config | For the WAF section | The WAF section expands into nothing |
| Threat feed | Recommended | Reputation has no sources and scores nothing |
| Bot policy | Optional | The bot guard uses the first enabled policy; with none, it does nothing |
| Challenge provider | Only for a challenge tier | A challenge tier with no provider cannot present anything |
| ASN database | Optional | No network classification signal |
Everything lives under Threat Protection in the Otoroshi sidebar. The first entry, Overview, is an overview page: it explains how the pieces fit together and reads the live state of your install to say what is worth doing next. If you get lost in this tutorial, it is the page to go back to.
Step 0 — Check the shared state first
Do this before creating anything, because the answer changes what the rest is worth.
Open Threat Protection → Bans & incidents. The header reports:
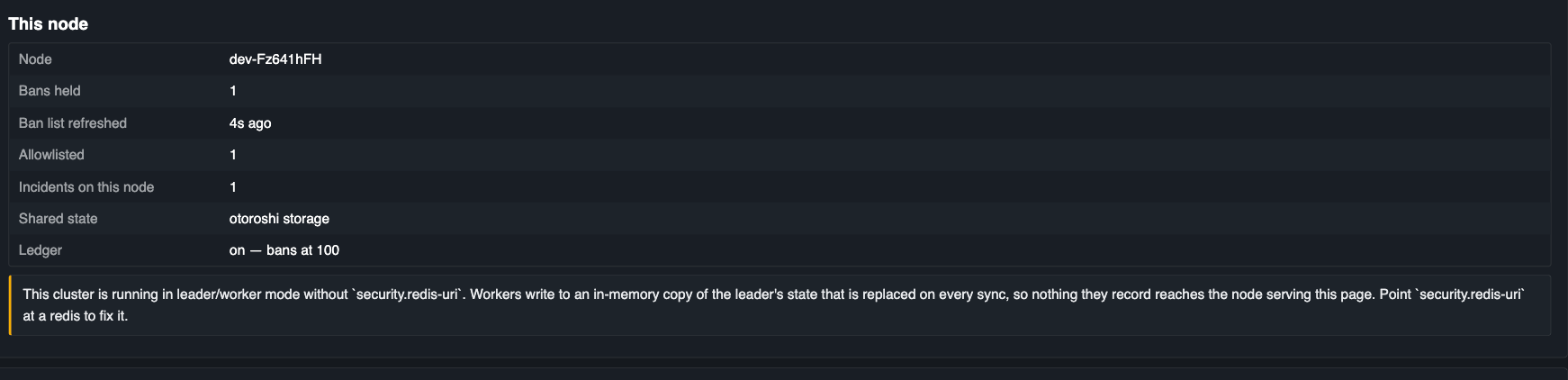
Node             otoroshi-node-1
Shared state     dedicated redis: no · distributed: no
Bans held        0
distributed: no means bans and the ledger are node-local. On a single node that is fine and
honest. On a cluster it means a caller banned on one node keeps being served by the others — which
is not a ban.
Point the suite at a redis to fix it:
otoroshi.admin-extensions.configurations.cloud-apim_extensions_waf {
  security {
    redis-uri = "redis://localhost:6379/3"
  }
}
This goes through the same stateful client manager as Otoroshi's distributed rate limiter, so it
works whatever your Otoroshi storage backend is. Restart, and the header should read
dedicated redis: yes.
Two of the five plugins — the gate and the response — are only as good as the ban registry behind them. Discovering on incident day that your bans were node-local is a bad day.
Step 1 — The threat policy
This is the brain. Every other entity produces evidence; this one decides what to do about it.
Threat Protection → Threat policies → Add item.
A new policy arrives with sensible defaults and dry_run: true. Keep it.
{
  "name": "api-example-com",
  "enabled": true,
  "dry_run": true,
  "tiers": [
    { "min_score": 40, "action": "log",    "status": 403 },
    { "min_score": 70, "action": "tarpit", "tarpit_millis": 3000, "status": 403 },
    { "min_score": 90, "action": "ban",    "ban_for_seconds": 3600, "status": 403 }
  ],
  "exemptions": ["10.0.0.0/8"],
  "ban_identity": "auto",
  "waf_block_weight": 50,
  "challenge_provider": null
}
| Field | What it does |
|---|---|
dry_run | true records the decision and lets the request through. This is the switch you flip last. |
tiers | Score thresholds and what happens at each. Highest matching rung wins, so order in the list does not matter |
exemptions | Addresses and CIDRs that skip the fabric entirely. Put your own workers and probes here |
ban_identity | auto bans the most specific identity known — apikey, then user, then address. So one bad partner does not take out the office behind a shared NAT |
waf_block_weight | What a WAF block is worth on the score |
challenge_provider | Only needed if a tier uses challenge — step 5 |
Available actions: log, challenge, throttle, tarpit, deny, ban. throttle lets the
caller go on at a quota per window and answers 429 past it; see
throttling.
Our /internal/* traffic comes from 10.0.0.0/8, hence the exemption. Do this now rather than
after a self-inflicted incident.
The ladder, once saved, reads like this:
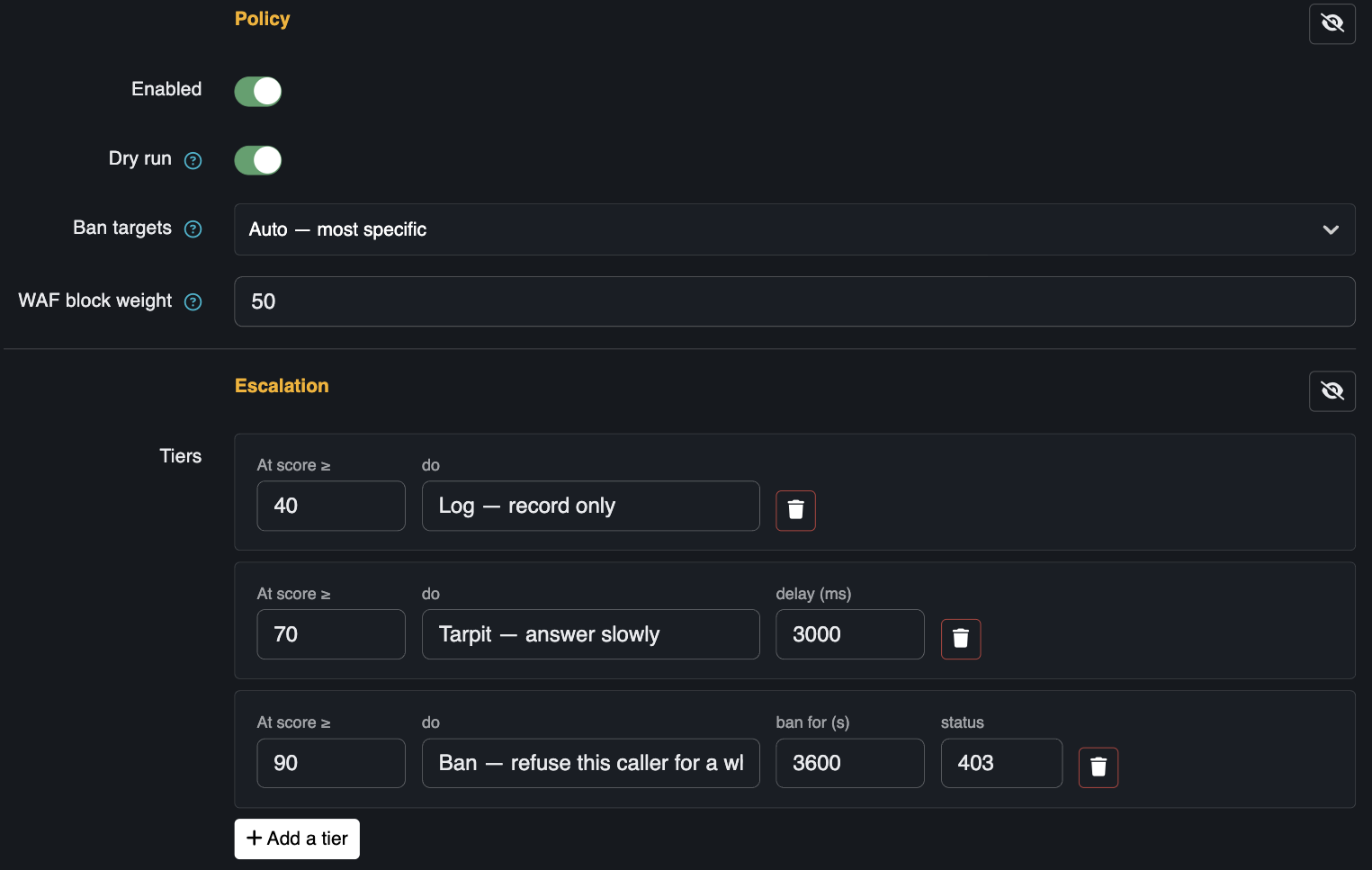
Sanity-check the tiers before anything else exists
POST /extensions/cloud-apim/extensions/waf/security/_simulate
{ "policy": "threat-policy_...", "score": 75 }
{ "done": true, "score": 75, "tier": 1, "action": "tarpit", "enforced": false }
enforced: false is dry run telling you the truth. Try 40, 69, 70, 95 and confirm the
ladder is what you meant.
Step 2 — The WAF config
Threat Protection → WAF configs → Add item.
Two lines get you the whole OWASP Core Rule Set:
@import_preset crs

SecRuleEngine On
Press Compile to check the ruleset parses, then save with:
{
  "name": "crs-monitoring",
  "enabled": true,
  "block": false,
  "inspect_input_body": true,
  "inspect_output_body": false
}
block: false is the WAF's own dry run: every rule is evaluated and every match is reported, but
nothing is denied. Note this is separate from the threat policy's dry_run — you will arm them
one at a time, in step 9.
Leave the CRS dials alone for now
The Core Rule Set section holds the two numbers that decide how aggressive CRS is: the paranoia
level and the anomaly thresholds. They are fields, with the cost of each level written next to it —
you do not hand-write SecAction directives for them.
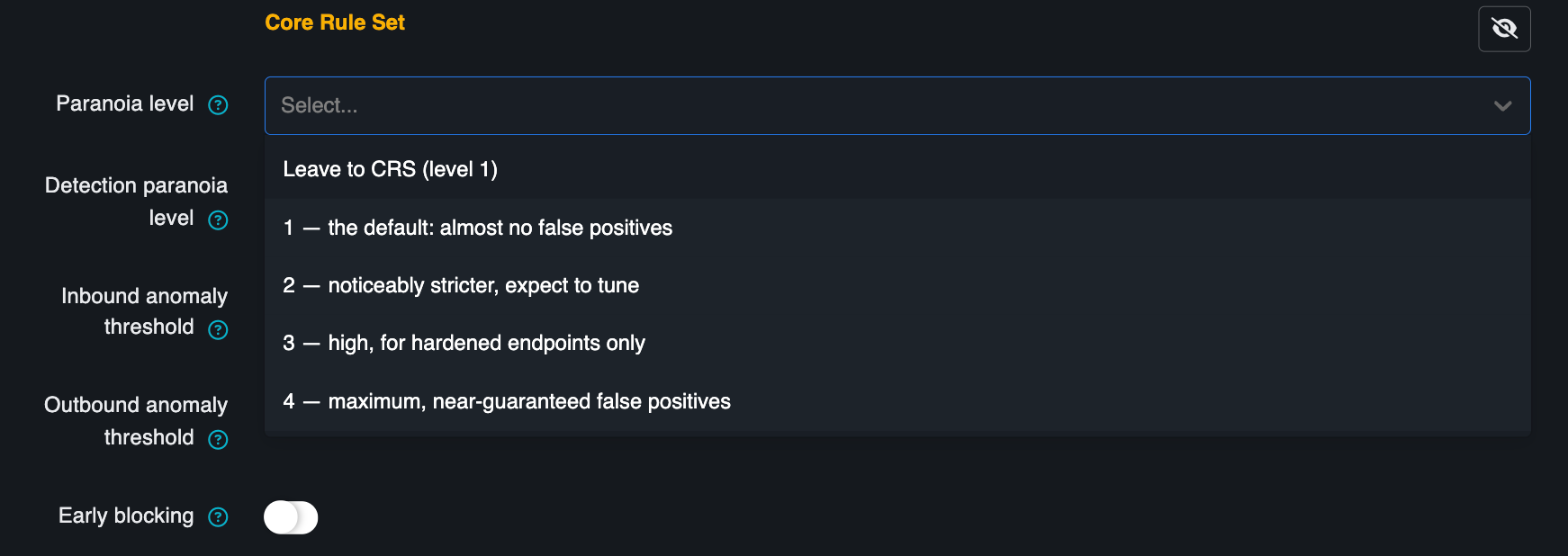
Leave every one of them empty. An empty section emits nothing, which means CRS runs its own defaults — paranoia level 1, threshold 5 — and that is exactly what you want for a first deployment. Level 1 is what CRS is tuned for, and raising it before you have tuned level 1 is the single most reliable way to end up with a WAF someone switches off.
Step 8 is where you find out, with numbers, whether this install can afford more.
Even with block: false, the WAF contributes its matches to the threat score. That is the whole
point of the fabric: a match nobody blocked on is still evidence, and it accumulates alongside
everything else. See how the WAF contributes.
Step 3 — Reputation sources
A blocklist
Threat Protection → Threat feed catalog. Fourteen curated sources are listed. Pick FireHOL level 1 — a conservative aggregation of well-established blocklists, and the usual starting point — and press Create a feed from this source.
Open the created feed and press Refresh now:
Entries          1 284
Merged ranges    1 190
Rejected lines   0
Last refresh     3s ago
Test an address with the Look up box before trusting it. The feed's own knobs:
| Field | Default | Note |
|---|---|---|
action | block for FireHOL 1 | block denies on its own; monitor only contributes weight |
weight | per source | What a match is worth on the score |
refresh_interval_seconds | 3600 | A failed refresh keeps the previous snapshot |
Add Tor exit nodes as a second feed if it matters to you — it is authoritative, published by the Tor Project itself.
Network classification, optionally
Threat Protection → ASN databases → Add item gives you address-to-network from the
public routing table. It ships as a low weight and never as a block: cdn 0, hosting 15, vpn
30. A datacenter is a hint, not a verdict — every legitimate server-to-server integration you have
comes from a hosting ASN too. See ASN classification.
There is no per-route selection for ASN databases: every enabled one is always consulted.
CrowdSec, optionally
If you run CrowdSec, CrowdSec bouncers → Add item consumes its decisions and can report your detections back as alerts. See CrowdSec.
Step 4 — The bot policy
Threat Protection → Bot policies → Add item.
A new policy arrives with 27 known signatures and rules that deny nothing:
{
  "name": "api-example-com-bots",
  "enabled": true,
  "rules": [
    { "target": "category:search",     "action": "allow",   "weight": 0 },
    { "target": "category:monitoring", "action": "allow",   "weight": 0 },
    { "target": "category:ai",         "action": "monitor", "weight": 0 },
    { "target": "category:seo",        "action": "monitor", "weight": 10 }
  ],
  "verify_known_bots": true,
  "verified_bypass": true,
  "impersonator_weight": 60,
  "impersonator_action": "deny",
  "unknown_bot_weight": 0,
  "deny_status": 403
}
The four categories are search, ai, seo and monitoring. Rule actions are allow, monitor
and deny — there is no challenge here on purpose: give the rule a weight that reaches a
challenge tier in the threat policy instead, so the decision stays in one place.
The two settings that matter most:
verify_known_botsdoes a forward-confirmed reverse DNS lookup on crawlers that publish a method. This is the interesting half:Googlebotis the most forged user-agent on the web, and a failed check turns a suspicious string into a demonstrated lie, worthimpersonator_weighton the score. Only cached lookups happen on the request path.verified_bypasslets a verified crawler through. Keep it on, or your first arming session will de-index/docs/*.
Since /docs/* is meant to be crawled, this default is already right for us. To act on AI
crawlers, change category:ai to deny, or give it a weight and let the policy decide.
The generated robots.txt matching your rules is available at:
POST /extensions/cloud-apim/extensions/waf/security/_robots_txt
{ "policy": "bot-policy_..." }
robots.txt is a request; the bot guard is the enforcement. Serve both.
Step 5 — The challenge provider (optional)
Only needed if you want a challenge tier — the rung between tarpit, which annoys everyone
equally, and deny, which costs a false positive everything.
Threat Protection → Challenge providers → Add item, kind pow:
{
  "name": "pow",
  "kind": "pow",
  "difficulty_floor": 18,
  "difficulty_ceiling": 24,
  "challenge_ttl_seconds": 300,
  "clearance_ttl_seconds": 1800,
  "cookie_name": "cloud-apim-clearance",
  "bind_ip": true,
  "bind_ua": true
}
This is a self-contained proof of work: no third party, no external call, no data about the visitor leaving the page. The difficulty scales with the caller's score, so a suspicious caller pays more than a merely unlucky one.
If you would rather use a widget, Challenge presets carries Friendly Captcha (Munich) and captcha.eu (Austria) for a European deployment, plus Turnstile and hCaptcha. See challenges.
Then point the policy at it and add a tier:
{
  "challenge_provider": "challenge-provider_...",
  "tiers": [
    { "min_score": 40, "action": "log" },
    { "min_score": 60, "action": "challenge" },
    { "min_score": 80, "action": "tarpit", "tarpit_millis": 3000 },
    { "min_score": 95, "action": "ban", "ban_for_seconds": 3600 }
  ]
}
Step 6 — Attach the preset to the route
Now the part that used to be five plugins.
Open the route, Add plugin, category Threat Protection, pick Cloud APIM Threat Protection - Preset. One slot:
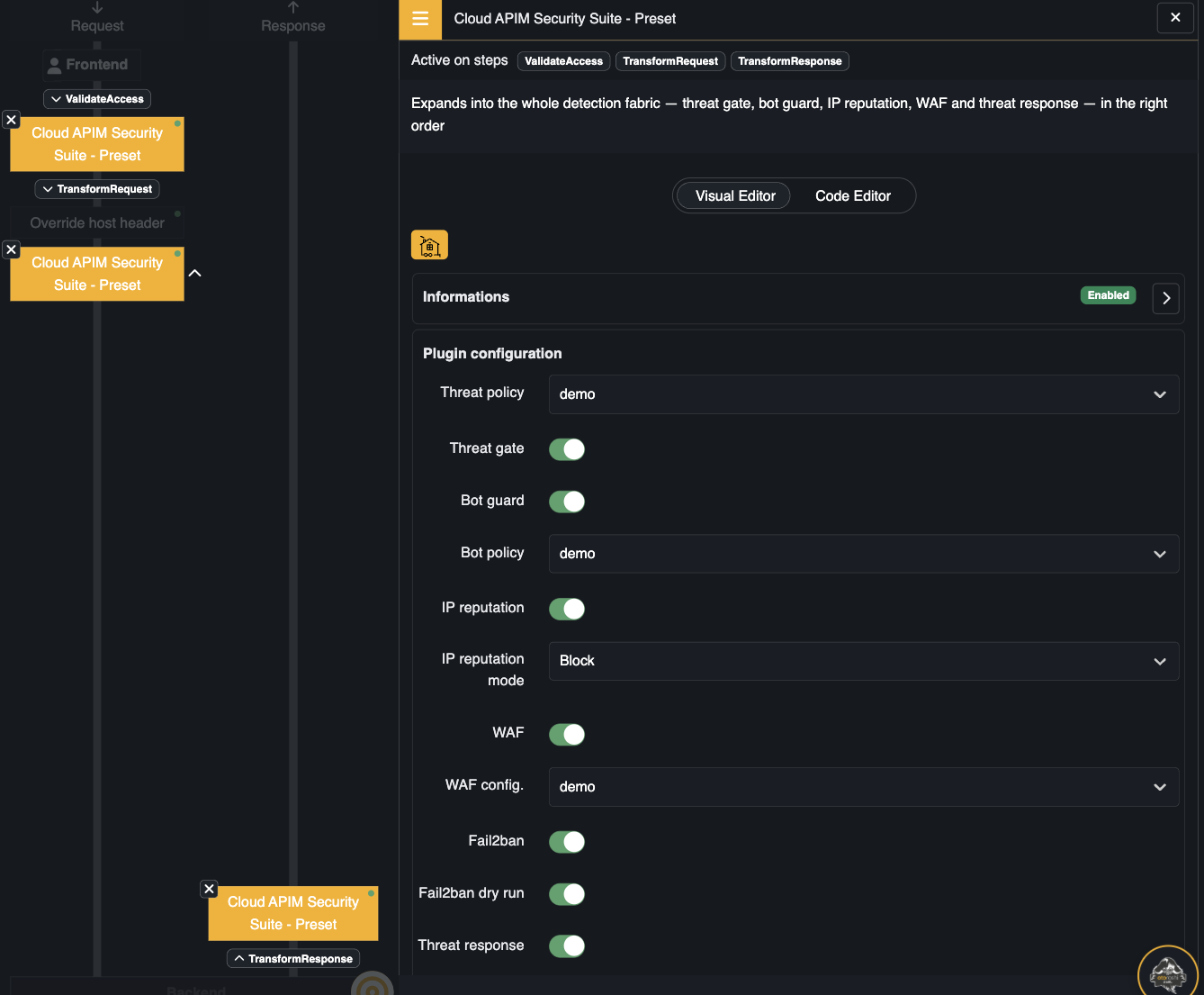
One slot in the flow, active on ValidateAccess, TransformRequest and TransformResponse — and
one panel with a switch per section. Everything the chain needs is here; the expansion happens at
request time.
{
  "threat_policy": "threat-policy_...",
  "bot_policy":    "bot-policy_...",
  "waf_config":    "waf-config_...",

  "gate": true,
  "bots": true,
  "reputation": true,
  "waf": true,
  "fail2ban": false,
  "response": true,

  "reputation_mode": "monitor",
  "fail2ban_dry_run": true,

  "include": [],
  "exclude": []
}
That expands, at request time, into the whole chain with the ordering fixed:
| Order | Plugin | Phase | plugin_index |
|---|---|---|---|
| 1 | Threat gate | access validation | 1.0 |
| 2 | Bot guard | access validation | 2.0 |
| 3 | IP reputation | access validation | 3.0 |
| 4 | Fail2ban (off here) | access validation | 4.0 |
| 5 | Cloud APIM WAF | request transformation | 1.0 |
| 6 | Threat response | request transformation | 900.0 |
Note reputation_mode: "monitor" for now: a feed set to block would otherwise deny on its own,
before you have seen what it matches. We will turn that up in step 8.
Otoroshi drops a preset's own include / exclude when it expands it. The route designer still
shows you those fields on the preset slot, and they will do nothing.
Use the include and exclude fields inside the preset's configuration — they are copied onto
every plugin it emits.
What the preset cannot do
The honeypot and the incoming-request-validator variants of the WAF and IP reputation run before routing, from the global configuration, where no route-level preset can reach them. That is step 10.
Step 7 — Watch it, and read what it says
Send real traffic through and leave it alone. Everything is in dry run, so nothing is being denied that was not already being denied.
The events
Every outcome emits one normalised CloudApimSecurityEvent, routable through any Otoroshi data
exporter:
{
  "event":  { "category": "threat", "action": "tarpit", "outcome": "observed", "severity": 2 },
  "source": { "ip": "203.0.113.9", "apikey": null, "user": null },
  "threat": {
    "score": 75,
    "tags": ["reputation:firehol1", "waf:match", "bot:seo"],
    "signals": [ /* full attribution: who contributed what, and why */ ]
  },
  "incident": { "id": "...", "count": 34 }
}
Three fields carry the whole story:
outcome—observedmeans dry run;blockedmeans it was enforced. While you are in dry run, every one of these should sayobserved. If one saysblocked, something else denied it — a feed set toblock, or the WAF, which have their own switches.threat.scoreandtags— what the caller accumulated, and from which detector.incident.count— thirty-four requests from this caller collapsed into one incident, which is why your alerting survives a scan.
The questions to answer before arming
| Question | Where to look |
|---|---|
| Would any tier have fired on a real customer? | Events with outcome: observed and a non-log action. Cross-check the source against your customer list |
| What is the score distribution? | The threat.score on your events. If everything sits at 0–20 your tiers are too high; if ordinary traffic reaches 40 they are too low |
| Which detector is loudest? | threat.tags. One tag dominating usually means one weight is wrong, not that you are under attack |
| Is any partner apikey accumulating? | source.apikey. A partner with a broken retry loop looks exactly like an attacker — and the allowlist is the answer, not a lower threshold |
| What would the WAF have blocked? | CloudApimWafTrailEvent with blocking: false and a non-null block — see tuning |
The live state
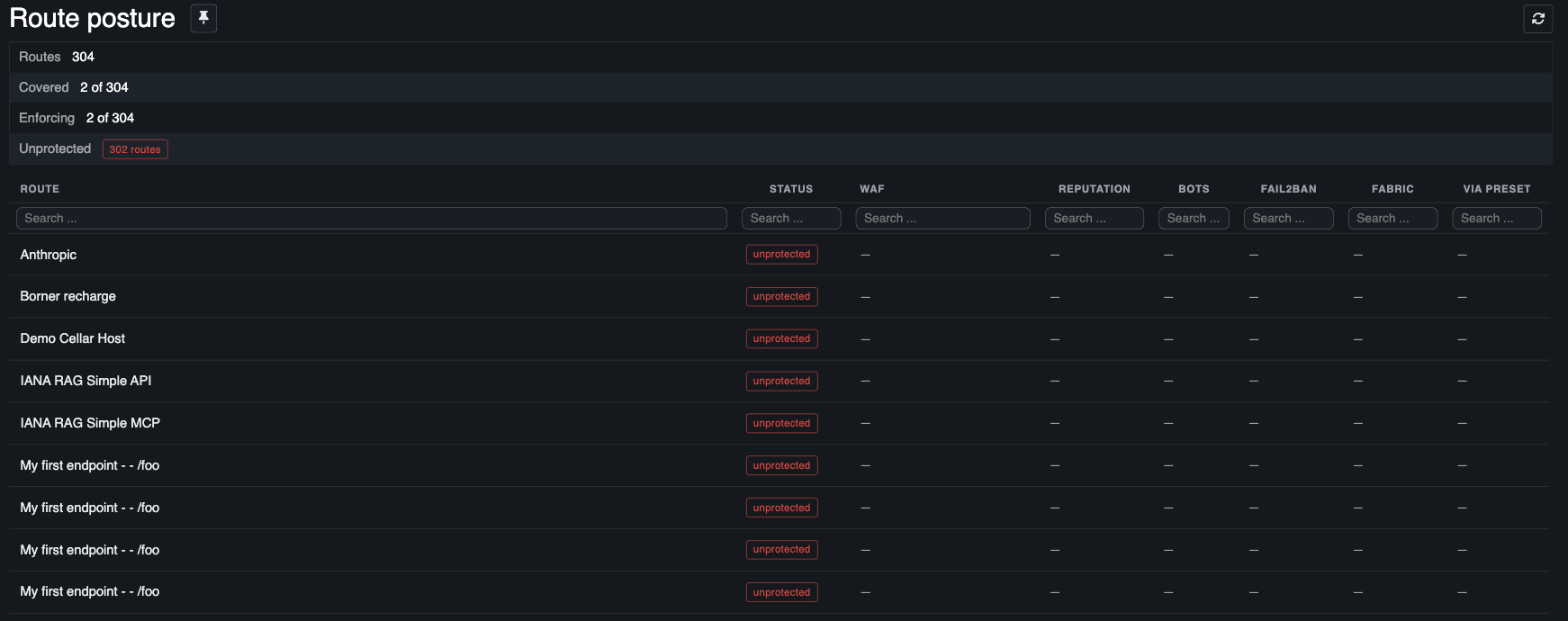
Route posture answers the other half — whether this route is actually covered, and whether anything on it can stop a request yet:
Bans & incidents shows what is currently held, and is where you work it:
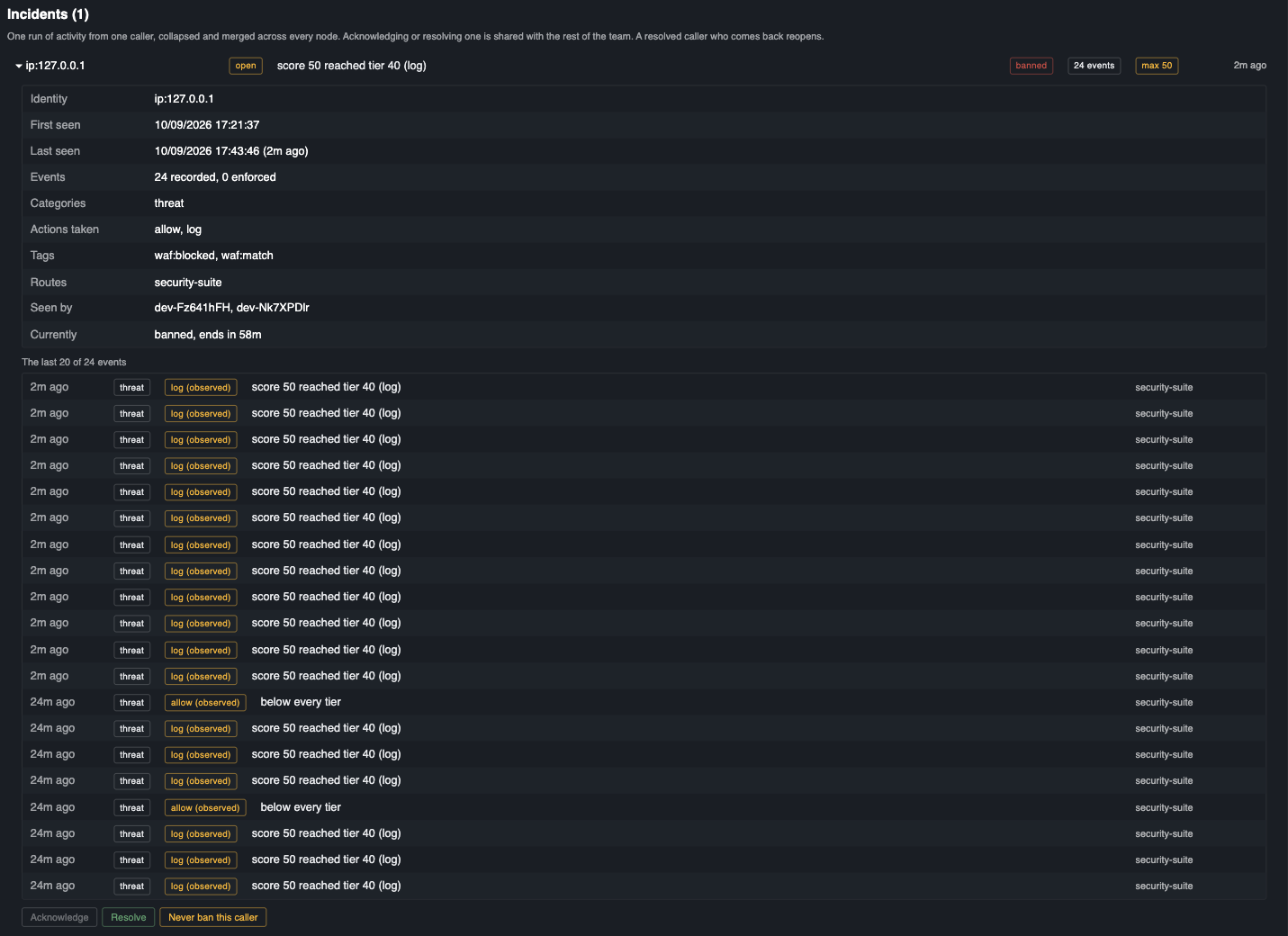
In dry run the ban list should be empty. If it is not, the ledger promoted someone on accumulated weight — open the ban and read what they actually did before deciding anything.
Three things worth knowing while you are still in observation:
N recorded, 0 enforcedis the whole dry run in one line. The fabric decided N times and stopped nothing. When that second number stops being zero, something is armed.- Incidents carry a state. Acknowledge one and the rest of the team sees it; resolve one and it drops off the list — until the same caller comes back, which reopens it rather than letting them have a second quiet run.
- The allowlist is for the partner you just recognised. It refuses the ban at the single point every module goes through, so nothing can put them back — and it does not switch off inspection, so the WAF keeps watching them. Lowering a threshold to accommodate one caller would have cost you everywhere.
Endpoints, if you would rather script it:
GET  /extensions/cloud-apim/extensions/waf/security/_status
GET  /extensions/cloud-apim/extensions/waf/security/_bans
GET  /extensions/cloud-apim/extensions/waf/security/_incidents
GET  /extensions/cloud-apim/extensions/waf/security/_ledger
GET  /extensions/cloud-apim/extensions/waf/security/_allowlist
POST /extensions/cloud-apim/extensions/waf/security/_unban   { "ref": "ip:203.0.113.9" }
POST /extensions/cloud-apim/extensions/waf/security/_allow   { "ref": "apikey:partner-ci", "reason": "nightly sync" }
Step 8 — Let the evidence decide when to arm
Step 7 told you where to look. This step answers the question those numbers exist for: can this configuration be armed, and what will it cost? Guessing it is how a rollout either stalls in monitoring for eight months or breaks a customer on the first day.
Threat Protection → WAF learning mode, pick your WAF config, Start.
Then leave it alone. A window is worth what the traffic in it is worth, so it needs to cover a representative period — a working week including a deploy is a good default. Batch jobs, a monthly close, a partner's nightly sync: if it happens, it should happen inside the window.
Counting is per node, in memory, flushed to the shared state on a timer, so the request path pays nothing measurable and a restart does not lose the window.
Reading the report
| What it says | What to do with it |
|---|---|
| Paranoia advice | If most of the noise lives above level 1, the level was raised past what this traffic tolerates — one line replaces forty exclusions |
| Threshold advice | A curve, not a number: at each candidate threshold, how many of the sampled denials survive |
| Proposed exclusions | Each one run before it is offered — the rule has to actually stop firing, and the attack corpus has to still be caught |
| Arming impact | How many requests would newly be denied, and how much of that the proposal removes |
Two things the report refuses to do, and both are the point:
It does not report a residue from rule counts. A denial under anomaly scoring is several rules agreeing, so it keeps the actual combinations and calls a sample resolved only when every rule that fired on it is excluded. The estimate errs low, which is the right direction before arming.
It does not print an arming cost it cannot measure. In SecRuleEngine DetectionOnly the engine
keeps only the last phase's verdict, so the figure is withheld rather than shown as zero. The report
says which mode it read and what that mode can tell you.
Apply what it verified. Nothing is ever applied on its own, and nothing is written that has not been demonstrated to work — an exclusion the engine ignores is refused rather than saved, because a saved no-op is indistinguishable from a fix right up until the incident.
Learning mode is for the batch. When a single rule starts objecting to one customer's perfectly ordinary input three weeks from now, the tuning assistant turns that one match into a verified exclusion without opening a window. Same verification, one sample.
Step 9 — Arm it, one switch at a time
There are four independent switches. Turn them on one per deployment, and wait between them. If something breaks, you want to know which one did it.
| # | Switch | Where | What changes |
|---|---|---|---|
| 1 | block: true | WAF config | The rule engine starts denying. Highest false-positive risk of the four — read tuning first |
| 2 | reputation_mode: "block" | Preset config | A feed marked block denies on its own |
| 3 | dry_run: false | Threat policy | The tiers become real. Challenge, throttle, tarpit, deny and ban all start happening |
| 4 | fail2ban: true | Preset config | Optional, and its own dry run — see below |
Between each one, go back to step 7 and read the events again. outcome flipping from observed
to blocked on traffic you recognise is the signal to stop and tune rather than continue.
Switch 1 is the one to have evidence for. If you did step 8,
you already know roughly how many requests block: true will newly deny and which rules they will
hit. If you skipped it, you are about to find out in production.
ban_for_seconds: 3600 is a good first value. An hour is long enough to end an attack and short
enough that a mistake is survivable. Raise it once you trust the score.
Fail2ban, if you want it
The fifth detector, off by default, because it is the only one whose trigger you produce: a
401 from a broken client of yours is indistinguishable from a credential-stuffing attempt.
Turn on fail2ban: true, leave fail2ban_dry_run: true, read the events for a week, then arm it on
the plugin. Its defaults count 401, 403, 407, 429 — deliberately not 404 (ordinary traffic) or
5xx (your own fault, and the ban would outlive the rollback). See fail2ban.
Step 10 — The global layer (optional)
Three plugins run before routing, off the global configuration. They cover traffic that matches no route at all, which a route plugin structurally cannot.
The honeypot is the one with the best ratio of value to effort: decoy paths nothing legitimate ever requests, so a hit is a scanner with essentially no false-positive risk.
Create the policy first — Threat Protection → Honeypots → Add item — which ships with
default paths (/.env, /.git/config, …), weight: 100, action: deny, ban_for_seconds: 86400,
status: 404. Then, since there is no UI for the global validator list, edit the global
configuration JSON:
{
  "plugins": {
    "config": {
      "incoming_request_validators": [
        {
          "plugin": "cp:otoroshi_plugins.com.cloud.apim.otoroshi.extensions.waf.plugins.IncomingRequestValidatorCloudApimHoneypot",
          "enabled": true,
          "config": { "policy": "honeypot-policy_..." }
        },
        {
          "plugin": "cp:otoroshi_plugins.com.cloud.apim.otoroshi.extensions.waf.plugins.IncomingRequestValidatorCloudApimIpReputation",
          "enabled": true,
          "config": { "mode": "monitor" }
        }
      ]
    }
  }
}
Order matters here — validators run in the order listed, so put the cheap checks first. See global plugins are not route plugins.
Verifying each layer
Once armed, each layer can be provoked on purpose.
# the WAF — a payload the CRS recognises
curl 'https://api.example.com/v1/search?q=1%27%20OR%20%271%27%3D%271'

# the bot guard — a forged crawler, which reverse DNS will disprove
curl -H 'User-Agent: Googlebot/2.1 (+http://www.google.com/bot.html)' https://api.example.com/docs/

# the honeypot — a path nothing legitimate requests
curl https://api.example.com/.env

# reputation — look an address up without sending anything
curl -X POST .../extensions/cloud-apim/extensions/waf/reputation/_lookup -d '{"ip":"203.0.113.9"}'
Each one should appear in the events with the tag you expect. If a layer produces nothing, it is almost always one of the traps below.
When it does not work
| Symptom | Cause |
|---|---|
| Nothing is ever denied | The threat policy is still dry_run: true. That is the default, and it is the point |
Events show action but never blocked | Same. Check enforced in the event's decision |
| The WAF matches but the score does not move | Only relevant on a hand-composed chain: check contribute on the WAF slot. The preset always emits it on |
| The preset's include/exclude does nothing | Otoroshi drops it at expansion. Use the fields inside the preset config |
| A ban does not apply on other nodes | distributed: no — go back to step 0 |
| Verified Googlebot is being denied | verified_bypass is off |
A challenge tier does nothing | No challenge_provider on the policy |
| Everything from one office gets banned | ban_identity is ip behind a shared NAT — use auto |
What you end up with
Five plugins on the route from one slot, in an order that cannot be got wrong, feeding one score that one component acts on with a graded response — and a full audit trail of why, whether or not anything was enforced.
Where to go next:
- How the fabric works — signals, score, decision, in detail
- Threat policies — tiers, tuning, exemptions
- Bans and memory — the ledger, and how a caller gets promoted to a ban
- Incidents — correlation, and what to feed a SIEM
- Tuning the WAF — false positives, exclusions, going to blocking safely
- The tuning assistant — one match, one verified exclusion
- Learning mode — the window, the report, and the arming estimate
- What a complete deployment needs — the redis and the postgres, and why
- Operations — what to monitor once this is live